Drive your Meetings with Google Maps

Google Maps is optimized to find your way from A to B. In your meetings you usually want to achieve the same. That’s why, suprisingly, Google Maps gives you perfect guidance on how to drive your meetings:


Use your imagination, visualize!

Imagine “Google Maps” without a visual map! Would you use it? No way! A picture says more than 1000 words . It helps your brain to get an overview. It is a foundation for your conversations.

Start with where you are

google-maps-1
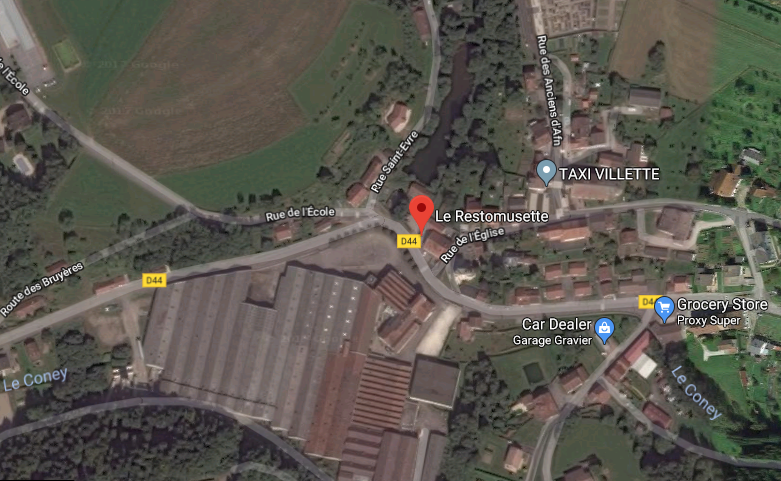
Put all people into your context so they can see what you are talking about. Describe what your current situation is. Possibly you want to include what was already achieved, what is working well, and what things are missing or hurting yet.

Examples:

  • Current state of your software architecture. Requirements already fulfilled by your application. Issues that you are currently facing, or what is not currently possible to do.

Define where you want to go

google-maps-2
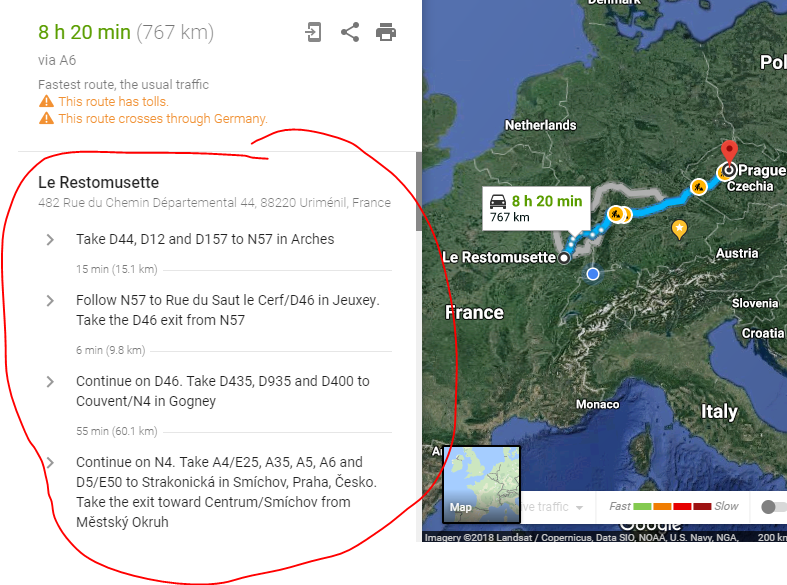
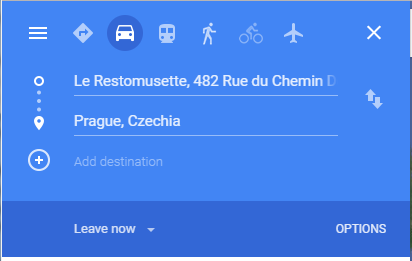
State a clear goal where you are about to head. By this  I don’t meant the objective of the meeting. Your google maps consultation’s objective is not Prague. It is to find the route to go to Prague.

Examples:

  • New requirements that need to be built in. What specifically is needed in your application to fulfill this requirement?

Zoom out (this is automatically done by Google Maps once you entered your destination)

google-maps-3
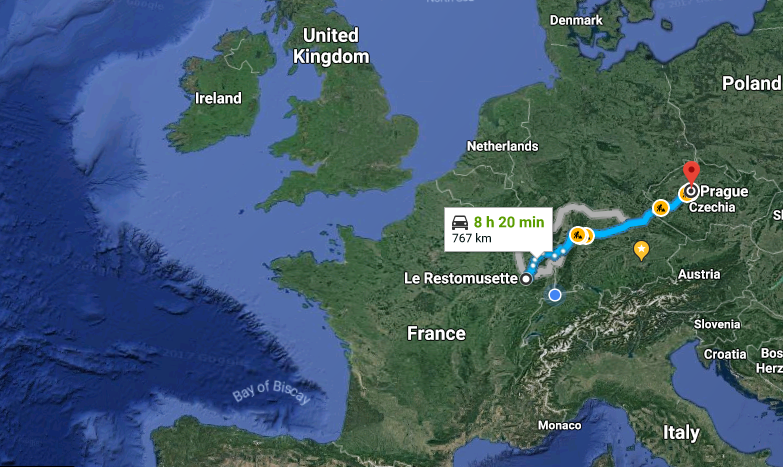
Start to gather ideas; this is a “divergent” phase: It may seem a bit chaotic and not be clearly targetted towards the objective of the meeting. What’s important here is to get everything possibly important on the table: What problems could you face? What people could be involved? What tools, hints, solutions come to mind? What problems are related and may need to be considered? Etc.

Visualize everything. You can paste sticky notes  on a wall, draw all ideas into a single visualization on a whiteboard or whatever you see(!) fit.

Find possible routes

Of course Google Maps also does this for you:

google-maps-4

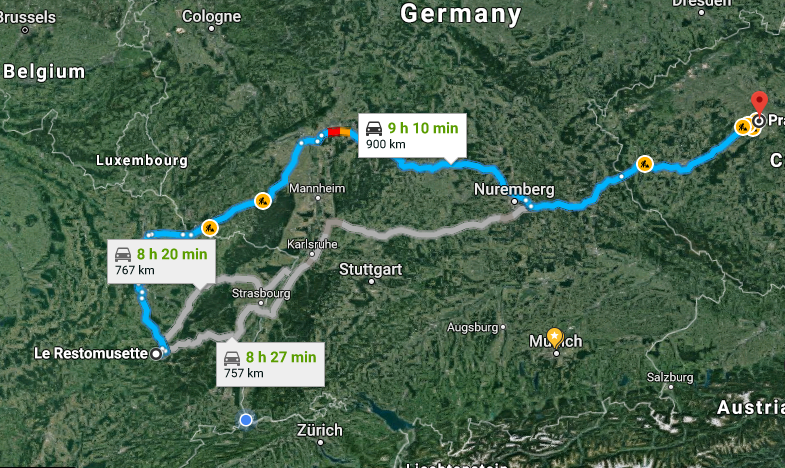
Try to cluster all the gathered data in some ways to condense them into 3-5 sketched solutions. Don’t try to do everything on your own. All people in the room should participate. You only faciliate this by moving around sticky notes, drawing stuff on your “map”, etc.
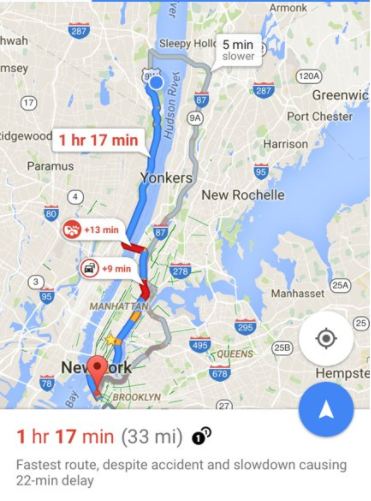
Assess the routes

For each route in Google Map you can see kilometers, hours and minutes, construction sites  and more on the map.

List the advantages, disadvantages, risks and assumptions of each suggested solution. Of course, again, you do this together with all the people in the room.

Decide on a route and generate directions.

google-maps-8

List the action items required. Each action item must be a clear and comlete sentence. E.g. instead of “finance”, state “Ask finance whether XY would be a good fit for them.” Furthermore, each action item must have a timeline and a name assigned, otherwise it will only fill some space in your Wiki but never be executed.

After the meeting: Continuously reassess your planned route and adapt it if necessary.

google-maps-9

Things “can” not change, they will!  You may need to replan action items or even change the route – let alone the shifts of the goal itself.


Closures leading to “Type not marked as serializable” exception

Today I faced a SerializationException that refered to some anonymous inner class stating it was not serializable, when IIS tried to store the session in the ASP.NET State Service:

Type ‘Xyz+<>c__DisplayClass10’ in Assembly ‘Xyz, Version=1.2.5429.24450, Culture=neutral, PublicKeyToken=null’ is not marked as serializable.

I looked for lambdas in my code and found quite a few, but most of them were not new and did never have any issues in serialization. But then I noticed that I had built in a new lambda expression that “happened” to build up a closure.

I have built a very simple example to confirm that closures are not serializable whereas “normal” functions are:

[TestFixture]
public class GeneralUnderstandingTests
{
    [Serializable]
    private class ASerializableType
    {
        private readonly Func thisIsAClosure;
        private readonly Func thisIsNotAClosure;

        public ASerializableType()
        {
            // Normal functions are allowed: The following
            // succeeds to serialize
            const int SomeConst = 12345;
            thisIsNotAClosure = () => SomeConst;

            // But closures are compiled to non-serializable
            // inner classes and break serialization:
            var someVariable = 12345;
            thisIsAClosure = () => someVariable;
        }
    }

    [Test]
    public void ASerializableType_CanBeSerialized()
    {
        var sessionState = SessionStateItemCollection();
        sessionState["sut"] = new ASerializableType();
        sessionState.Serialize(
            new BinaryWriter(new MemoryStream()));
    }
}

This test fails but goes green as soon as the line thisIsAClosure = … is commented out. The line thisIsNotAClosure = … however does not cause any issues as SomeConst is not a variable but a constant, that is, it does not build a closure but is inlined by the compiler.

New Feature Request: [Rotten] attribute

This is an inoffical new feature request – I am floating between sarkasm and really considering to implement this.

Here it is, I proudly present:

The [Rotten] attribute*

* Other candidate names are: [Smells], [CodeSmell], [Stinks]

The principle is simple:

  1. If you find a piece of code that is of very low quality, annotate it with the [Rotten] attribute.
  2. The tooling (e.g., Resharper, CI, any quality management tools such as SonarCube) does the rest for you:
    • The properties, methods, or classes (short: code unit) marked with the attribute are considered “rotten” and are marked as such – this could be anything ranging from a simple Resharper warning to a “rotten lines quotient” or the like, to gamification tools such as the Jenkins game plugin which would punish the introduction of and reward the removal of rotten code (though introduction of the attribute and the cascading markings should not count).
    • Any code unit that directly depends on a rotten code unit is itself considered rotten.
    • Any code unit that directly inherits from rotten code is itself considered rotten, too.
    • These rules are applied recursively such as to propagate the rot to the uttermost thing depending on the rotten cluster of code.

Help – my code is marked “rotten” – what can I do?

You can take the following measures to bring down your “rotten code quotient”:

1. Fix the rotten code.

Cover it with unit tests, refactor it, fix the bugs, remove the smell, make it readable. Once you are finished, remove the attribute – all of your dependent code will immediately get rid of its “rotten” status, too.

2. If 1. is not (yet) possible: Protect yourself against the rotten code

Remove direct dependencies on rotten units. For “has-a” dependencies: Invert your dependency. Put a well-defined interface between the two units. Then you can cover both sides with unit tests to document the behavior of the rotten unit, including correct and incorrect parts, and verify that your “clean” unit handles both correct and incorrect parts properly. It will also loosen the coupling of your not-in-itself-rotten code to the rotten part. It will improve odds that you will ever be able to simply exchange the rotten unit by a newly-written one.

In severe cases you could even consider to introduce a mediator class/adapter class between rotten and clean units. They could “even the bumps” and prevent the clean part from assimilating to the rotten part.

For “is-a” dependencies (i.e., subclasses) – Stop inheriting from that rotten base class. Introduce an interface for other code pieces so you can satisfy them without inheriting from a base class. Introduce a new clean baseclass, or stop subclassing at all – it might be part of the problem that led to the code rot.

3. Are you kidding?

Kind of. Only. If you take the measures above, you will manage to keep as much as possible of your code secure from being infected by the rot of the already-rotten parts. If you do not take these measures, and the code that you might consider clean depends on rotten code, your clean code will misbehave and become hard to maintain just as the rotten code does, because code rot is infectious. This is why this code is harshly considered “rotten”, too, thus providing an incentive to fix that.

Polymorph Razor Views

As an object-orientation-spoiled programmer, when you come to use an HTML rendering engine such as Razor you will soon start to wish for the same couple of design advantages that object orientation brings along.

Using polymorphism in “class-ic” object orientation, e.g., you can do things like that (simplified code snippet – don’t try copy-paste):

class Person
{
    string FirstName { get; set; }
    string LastName { get; set; }
    virtual string FormatName()
    {
        return FirstName + " " + LastName;
    }
}

class PersonWithMiddleName : Person
{
    string MiddleName { get; set; }
    override string FormatName()
    {
        return FirstName + " " + MiddleName + " " + LastName;
    }
}

That means, you can write some generic code that iterates over a couple of Person objects and prints their names without caring how they are actually built. By default a Person would yield their first and last name when invoking FormatName, but if you need to print a middle name, too, you can simply subclass Person and override FormatName. When invoking FormatName on an instance of PersonWithMiddleName, even when it is known as Person only, it will apply the most special implementation found, here the one including the middle name.

The good news – you can get that in Razor, too

Razor has a concept that reminds me of the same type of polymorphism. Using Display Templates and Editor Templates you can define a general template to render a Person:

@* ~/EditorTemplates/Person.cshtml *@
@model Person
<div class="Person">@Model.FirstName @Model.LastName</div>

This template applies each time you use EditorFor with a Person type property:

@* suppose a class Book { Person Author { get; set; } *@
@model Book
@Html.EditorFor(m => m.Author)

Now say we have a book with a PersonWithMiddleName author. Then the Person template is still applied, because PersonWithMiddleName inherits from Person. But we have the option to override the template for the special class:

@* ~/EditorTemplates/PersonWithMiddleName.cshtml *@
@model PersonWithMiddleName
<div class="Person">
@Model.FirstName @Model.MiddleName @Model.LastName
</div>

Now, whenever the book has a PersonWithMiddleName author, this template applies. For all other Person objects, the Person.cshtml applies.

We can take it a step further! “Base templates”

If you did not know of Editor Templates before, you might be so excited about them now that you want to try them out right away and cannot think clearly enough to head on reading. Just return later.

If you already did know Editor Templates you might have been wondering: Can we take it a step further? In C# the overriding method can call its base method to reuse the code of the base class:

class PersonWithMiddleName : Person
{
    string MiddleName { get; set; }
    override string FormatName()
    {
        return base.FormatName() + ", middle name: " + MiddleName;
    }
}

Can we do that with Editor Templates?

We can, making use of this helpful answer on stackoverflow.

@* ~/EditorTemplates/PersonWithMiddleName.cshtml *@
@Html.Partial("~/EditorTemplates/Person.cshtml", Model)
, middle name:
@MiddleName

At a first glance you might think it looks a bit clerky but it is not: Just as a subclass needs to reference its base class with its full class name including the namespace, we reference the “base template” using its full path. We simply pass that template the same model. Thus it also uses the exact same ViewData (e.g. the “HtmlFieldPrefix”). Thus we pass it the context, which is kind of analaguous to the “this” keyword in C#.

Template Method Pattern

Now we get to an even more interesting point: If we have inheritance and polymorphism at hand, can we use any of the popular object oriented design patterns?

I tried the template method pattern. It is very useful in this place because when you render a view it is pretty likely that you want to “inject” some additional HTML in the midst of the rendering output of the base template.

Taking the example from above, let us say we want to render FirstName + MiddleName + LastName again:

@* ~/EditorTemplates/Person.cshtml *@
@model Person
@{
    var extension1 = ViewData.ContainsKey("ExtensionPoint1")
        ? ViewData["ExtensionPoint1"] : string.Empty;
}
<div class="Person">
    @FirstName
    @Html.Raw(extension1)
    @LastName
</div>

The template basically renders FirstName + LastName but provides an “extension point” for inserting HTML between the two names. A pretty silly application of the pattern, but, you know, it is an example only.

The extension must be a string containing HTML. It is only rendered if you provide it.

@* ~/EditorTemplates/PersonWithMiddleName.cshtml *@
@model PersonWithMiddleName

@{
    var extension1 = @RenderMiddleName().ToString();
    ViewData["ExtensionPoint1"] = extension1;
}
@Html.Partial("~/EditorTemplates/Person.cshtml", Model)

@helper RenderMiddleName()
{
    @MiddleName
}

Our specialized template makes use of the Person.cshtml “base template” for rendering the parts that the base template already knows best how to render. But it combines that with its own specializd rendering by only injecting the part that is really different from the base template – the middle name.

We don’t define the extension1 string directly but use a Razor helper instead. This allows us to make use of the Razor syntax to define the part to inject rather than writing lenghy worms of plain HTML strings.

Conclusion

Using Editor Templates (and Display Templates) in a smart combination with Html.Partial and ViewData you can leverage a (maybe) unknown range of object-oriented techniques for building your web pages, allowing for a modular, clean design in this part of your web application just like in the rest of your application, thus improving code reuse and maintainability of your templates.

I think this is great news! What do you think? Have you been using this approach before? Do you have better ideas? Or do you see any issues with this approach?

No more copy & paste in my IDE

This is day one of my new trial.

I have removed the key shortcuts for copy & paste from Visual Studio. I have seen too much of code duplication, some of it bears my very own signature. More often than not it is evil. I am aware that there are times copying might be fine. But the few times that this is the case, having to navigate to the menu should not be too heavy of a burden. However I hope that the time and inconvenience it takes to navigate there will trigger the thought process of what I am about to do, why I am doing it and whether there might be better ways.

Depending on the outcome I might re-add the shortcuts or else remove the menu options, too.

step-1

step-2

step-3

Do not fix code duplication*

(* Full title: – Do not fix code duplication – solve it)

When you find two identical or near-identical pieces of code in your codebase this is identified as code duplication. There are many resources to learn why code duplication is an issue.

When you find duplicate code, the intuitive reaction is to fix it right away. Don’t. Here is why:

There is a subtle difference between fixing an issue and solving it. Fixing means to remove it. Solving means to analyze the root cause and fix that. When you fix code duplication the typical thought process is: “Oh, here is a piece of code, and here is the same again. That’s bad. Let us merge them. Hm, maybe we can extract a new private method. Or we create a class for it. Or we place it in this class here, since this is already used in both places anyway. Oh yes, let’s do that.”

However, when you find duplicate pieces of code this is usually not the root issue. It is only a smell. There might be a flaw in your design. The place of your code might be discrepant from where the associated semantic concept belongs to.

Take this example:

We have a model class that represents a service product in three shapes: Basic, Medium, Top. We find this in a property:

class Product
{
    int ProductType { get; set; }
}

Then we have a document generation module for printing contracts or offers. Therein we find multiple blocks of the form

if (product.ProductType == Constants.MEDIUM
    || product.ProductType == Constants.TOP)
{
    ...
}

We could fix that by extracting a local variable:

var isMediumOrTop = product.ProductType == Constants.MEDIUM
                    || product.ProductType == Constants.TOP;

Or we could extract a method

private static bool IsMediumOrTop(product) {...}

No, much better. Let us introduce a helper class.

public class AllPurposeDocumentGenerationHelper { ... }

We won’t do that.

Instead we lean back and think:

  • We have duplicate code. Why is that?
  • Is there a business meaning attached to this condition?
  • What is it?

We find that actually the business wants to “unlock” a certain special offer in the product if you buy the medium version or above. So it is a business thing. It is nothing specific to generating a document, nor is “IsMediumOrTop” necessarily a good name to represent it.

Recognizing that, we decide that the model needs to be extended:

bool SpecialOfferIncluded
{
    get
    {
        return ProductType == Constants.MEDIUM
               || ProductType == Constants.TOP;
    }
}

The conditionals in the document generation will now look like this:

if (product.SpecialOfferIncluded) { ... }

The semantic meaning will be immediately clear to the reader (and coder). Also, by looking at the new model property you will learn a business rule: “If the product type is medium or top, the special offer is unlocked.”

Next we notice that in our front end code we have the same conditional but there it was not so obvious:

if (product.ProductType == Constants.BASIC) { ... }

Gotcha!

if (!product.SpecialOfferIncluded) { ... }

No, wait! We wanted to lean back and think first. While doing that, it might turn out that this piece of code is actually not related to the special offer thing. Instead it is really specific to the product type. Luckily we now have a way to make a semantic distinction between the two meanings.

Soon the business will come to you and tell you that in the next version, the SpecialOffer should be included only if the price exceeds a certain limit. Easy:

bool SpecialOfferIncluded
{
    get
    {
        return Price > Constants.MIN_PRICE_FOR_SPECIAL_OFFER;
    }
}

Done.

Conclusion

When you face duplicate code, take it as a opportunity to think about your design, the business, and how well the design represents the semantics of your application. There are good chances you will find a way to improve that, thus having really solved the root issue of the duplicate code rather than just having it fixed in an arbitrary way.

Generic Types are prettier than Dictionaries

If you need to pass key-value-pairs to a method you can find many modern implementations prefer to take them as an “object” rather than a dictionary. This allows you to create a anonymous object which is prettier than a dictionary: It is a shorter notation, and it brings along some of the advantages of static typing:

var result = MyMethodThatTakesAnAnonymousObject(
    new { foo = "bar", baz = 1 };


The method then reflects on the object and uses the property names as keys and their values as the – values.

What you might not have been aware of: The same can be done for return objects. If the caller of the method knows what keys it expects, you can support it by taking this expectation as an anonymous object:

var result = PleaseReturnTheResultInAnObjectLikeThis(
    new { foo = "", bar = 0 });
Console.WriteLine(result.foo);


And this is how it works:

[TestClass]
public class LittleTest
{
    [TestMethod]
    public void Test_A_Little()
    {
        var t = PleaseReturnTheResultInAnObjectLikeThis(new { Foo = "" });
        Assert.AreEqual("hello", t.Foo);
    }
    private T PleaseReturnTheResultInAnObjectLikeThis<T>(T input)
    {
        // The following line simulates any logic that creates keys and
        // values in any form. You can use LINQ to transform them into
        // a dictionary as a pre-step to fill them into your T object.
        var values = new Dictionary<string, object> { { "Foo", "hello" } };

        // The next line brings us to the heart of the idea
        return MapToGenericType(input, values);
    }
    private static T MapToGenericType<T>(T input, IDictionary<string, object> values)
    {
        var constructorInfo = input.GetType().GetConstructors().Single();
        var parameterInfos = constructorInfo.GetParameters().ToArray();
        var parameters = new object[parameterInfos.Length];
        foreach (var parameterInfo in parameterInfos)
        {
            parameters[parameterInfo.Position] = values[parameterInfo.Name];
        }
        var output = (T) constructorInfo.Invoke(parameters);
        return output;
    }
}

The clue is that an anonymous object always brings along its anonymous type with a constructor whose parameters are 1:1 the properties that you defined for the anonymous object. You can use generics to transport knowledge of the type of any anonymous object beyond the scope where it was defined.

This way you kind of define an expectation to the results in a static-typed manner. Your compiler will not guarantee that the expectations hold true though, you will only find it by the time that MapToGenericType is executed.

Unit Tests: An AAA-conform way to expect exceptions

I like the way how NUnit supports expected exceptions in unit tests – as opposed to some other frameworks, where you have to misuse a try-catch block

try
{
    DoSomething();
    Assert.Fail("exception expected");
}
catch (ExpectedException ex)
{
    // this is the good case, do nothing
}

in NUnit you can

Assert.Throws<ExpectedException>(() => DoSomething());

Or, if you want, you can make more assertions on the exception thrown:

Assert.Throws<ExpectedException>(
    () => DoSomething(),
    ex => ex.Message == "Failed to do this");

However, this unfortunately (still) breaks the AAA structure of a unit test. With only a tiny helper you can get an AAA-structured unit test that expects an exception:

// Arrange
var x = "foo";

// Act
var actualException = Catch<ExpectedException>(() => DoSomething(x));

// Assert
Assert.That(actualException, Is.Not.Null);
Assert.That(actualException.Message, Is.EqualTo("Failed to do this"));

And this is the helper:

public TException Catch<TException>(Action action)
    where TException : Exception
{
    try
    {
        action();
        return null;
    }
    catch (TException ex)
    {
        return ex;
    }
}

I think this is a big plus. What do you think? Does this approach have any drawbacks or caveats?

Major take-aways from ScrumMaster course

I took my ScrumMaster course three weeks ago and had the honour to take it with Jeff Sutherland as our teacher. This course was very insightful – a pity that it was so short! So I guess 90% of my learnings are hidden in the slides and in the back of my mind. But I’d like to write down and share with you some of the major takeaways.

What it is all about

Scrum is like a bootstrap program in a computer (BIOS). When you start Scrum it seems all chaotic (and it is). But by self-organizing and applying the rules it improves massively. However, if you change a bit in the bootstrap program, the computer does not work anymore.

The setup of Scrum aims in making an average team a very high-performing team. If the velocity of the team does not increase steadly throughout the sprints, that indicates that Scrum was not fully implemented.

According to Jeff, many Scrum teams have improved their performance by about 50%, which is fine. But it is not what Scrum was designed for. If your performance does not improve by about 300-400% after introducing Scrum, you are not implementing it right.

Both Wikispeed and Toyota can build a new car prototype every single week – they are both applying Scrum.

Steadily improving team performance

There are a few things that have proven to heavily increase performance:

  • Introducing (and sticking to) a proper Definition of Done (DoD) can double your velocity.
    (DoD defines criteria that have to be fulfilled by a freshly implemented backlog item to be considered “done”)
  • Introducing a proper Definition of Ready can double your velocity, too (resulting in a factor of 4 with the DoD)
    (DoR defines criteria that have to be fullfilled by a new backlog item before it can be taken into a sprint, e.g.: “Must follow I.N.V.E.S.T. criteria” + “Most of the team understand the item” + “The team has an initial idea for the architecture”)
  • Morale is a performance multiplier. The PO is critical to motivate the team with the project vision.

Here are a few performance killers.

  • The biggest waste in software development is incompleted work being taken over to the next sprint (not tested, technical debt…)
  • If you test a feature in the subsequent sprint which would have taken 1h to be tested in the current sprint, it can potentially take up to 24h instead.
  • “At midnight a bug turns into a feature” – cited by Jeff, unfortunately I am not able to find the original on google. If you find a bug (originating from the current sprint’s development), fix it immediately or it will we cost you a lot more. A bug not fixed within 9 hours is a good indication for the ScrumMaster that there is an impediment.

Roles and Meetings

Some new things I learnt about Scrum roles and meetings.

ScrumMaster

  • It is the ScrumMaster’s responsibility to maximize the team’s performance.
  • This means, the ScrumMaster is not simply required to teach the team how to do Scrum (I heard people say that experienced teams don’t need a ScrumMaster because they know how to do Scrum). The ScrumMaster’s duty is that the team performance improves in every Sprint.
  • If the ScrumMaster participates in programming, he adds some value but loses focus on improving the team’s performance.

Product Owner

  • The Product Owner (mainly) definies the Definition of Done! (I was thinking that the team does it.)
  • The PO must promote the vision of the project to motivate the team – Morale is a performance booster.
  • The PO plans the releases and sets either their scope or their date.
  • The PO (or someone from the PO team) must do the final acceptance test. Only he can move a backlog item to done.

Retrospective

  • The goal of the retrospective is to increase velocity. If velocity is not measured and inspected, the team cannot judge whether it improved over the last sprints. This is the main point of using story points for estimating user stories!
  • Only one action should result from a retrospective – only change one thing per sprint, but focus on really doing it.

Backlog refinement

  • It has proven useful to have a regular meeting for refining the top backlog items and make them “ready” according to the DoR – for example twice a week, discussing one or two stories each time.
  • It is not necessary that the whole backlog be estimated. Only estimate as many stories as are required by the Product Owner for release planning (and of course any item that will go into the next sprint).

Release Planning

  • By estimating the business value of each backlog item and ordering them properly, the items build a continuously increasing value-over-effort curve that starts off very steep.
  • The PO can maximize the value of the first release by planning it at the point where the curve turns from steep to flat.
  • The remaining backlog items sum up to only little value added with much effort. This is the value that would be added if the project was planned and executed as a whole.
  • The feedback from the first release enables the PO to create, modify and re-estimate items, resulting in a much greater value for the second release (and any subsequent releases equally).

Testing and Testers

  • Anybody can test – except the developer of the feature.
  • Final testing must be done by the PO (or anybody from his PO team)
  • Testing should not be made a state (“todo – in progress – testing – done”). Better make it a task.

Using Eric Hynds’ multiselect with knockout

Eric Hynds has crafted an awesome enhanced multiselection dropdown as a jQuery UI widget which enhances a normal <select multiple> list. Unfortunately, as many jQuery UI widgets, it manipulates the original HTML when being applied, which renders the normal use of the <select> knockout data-bindings in-effective.

Classical knockout binding for multiselect dropdowns:

<select multiple="multiple" data-bind="
    options: data.selectList,
    optionsText: 'Name',
    optionsValue: 'Value',
    selectedOptions: data.selectedOptions">

This select HTML element is replaced by the UI widget. The user then interacts with a set of buttons, divs, checkboxes, and more.

However, the good news to that is that the UI widget is designed such as to simply hide rather than removing the original element. Even better, when the user selects items in the UI widget, they also get selected in the original <select> element. Therefore with a little trick, we can make use of the knockout bindings for the original select list.

Simply add “multiselect: true” to the data-bind attribute:

<select multiple="multiple" data-bind="
    options: data.selectList,
    optionsText: 'Name',
    optionsValue: 'Value',
    selectedOptions: data.selectedOptions,
    multiselect: true">

We then define a new custom knockout binding called “multiselect”:

ko.bindingHandlers.multiselect = {
    init: function (element) {
        $(element).bind("multiselectclick", function () {
            $.data(element, 'donotrefresh', true);
        });
    },
    update: function (element) {
        var doNotRefresh = !!($.data(element, 'donotrefresh'));
        if (!doNotRefresh) { $(element).multiselect("refresh"); }
        $.data(element, 'donotrefresh', false);
    }
};

The core part to this is the $(element).multiselect(“refresh”), which causes the UI widget to re-build its select list based on the hidden original <select> list, which in turn is updated by knockout based on the model.

The other direction (view -> model) is covered by the UI widget itself: The widget updates the hidden select list, knockout consequently updates the model. There is one minor caveat though: The model update in turn triggers the “update” method of our custom binding. In this case, if we tried and called “refresh” on the UI widget, an error would occur. In order to prevent that, we hook into the click event, set a flag called “donotrefresh” and check it before calling “refresh”.

This way, the “refresh” method on the UI widget is only called if the model was changed from the “outside”, yet is not called if the model was changed due to user interaction with the widget.